Pi-hole is a DNS server you run on your own network which filters out any unwanted lookups and therefore reduces your bandwidth usage. I installed it in a Podman container and configured my OpenWRT box.
Pihole and OpenWRT

Preparation
My server runs on Rocky Linux and Podman is supported out of the box. Check Podman’s documentation to install it if needed.
Download the Pi-hole image. Probably it’ll be fetched from the Docker registry but it is compatible.
$ podman pull pihole/pihole
Create directories to have your settings persisted. My Podman containers run under my user, data is in my home directory.
$ mkdir /home/<username>/pihole
$ mkdir /home/<username>/pihole/dnsmasq
$ mkdir /home/<username>/pihole/pihole
Next, give the directories proper permissions. Because Podman does not run as admin, it cannot write to the newly created directories. Inside the container, Pi-hole runs as user pihole. To the outside world, this user is mapped to a fictive user with id 100998:100998. This is how it is mapped on my system.
Adjust the permissions accordingly:
$ sudo chown -R 100998:100998 ~/pihole/*
Open relevant ports on your server
Via the cockpit GUI, go to “Networking”. In the section “Firewall”, click “Edit rules and zones”. From there add port 80 (only TCP) for Pi-hole’s web GUI and port 53 (TCP and UDP) for the DNS server.
Start Pi-hole
Starting is done by one command:
$ podman run --init -d --restart=always --net=host -e TZ=Europe/Warsaw -e WEBPASSWORD=<yourpassword> -e SERVERIP=<yourserverip> -v ~/pihole/pihole:/etc/pihole:Z -v ~/pihole/dnsmasq:/etc/dnsmasq.d:Z --name=pihole pihole/pihole
Mind there is no sudo here. Most of the options explain themselves. The password and server’s IP address need to be set to your wish.
You can already browse the Pi-hole web interface. Be sure to test this.
If you see the webpage showing up, create a service so Pi-hole starts automatically whenever your server reboots. (Remember, you have automatic security updates enabled. This can cause restarts!)
$ cd ~/.config/systemd/user
$ podman generate systemd --new --name --files pihole
$ systemctl --user daemon-reload
$ systemctl --user enable container-pihole.service
Adjust the network settings
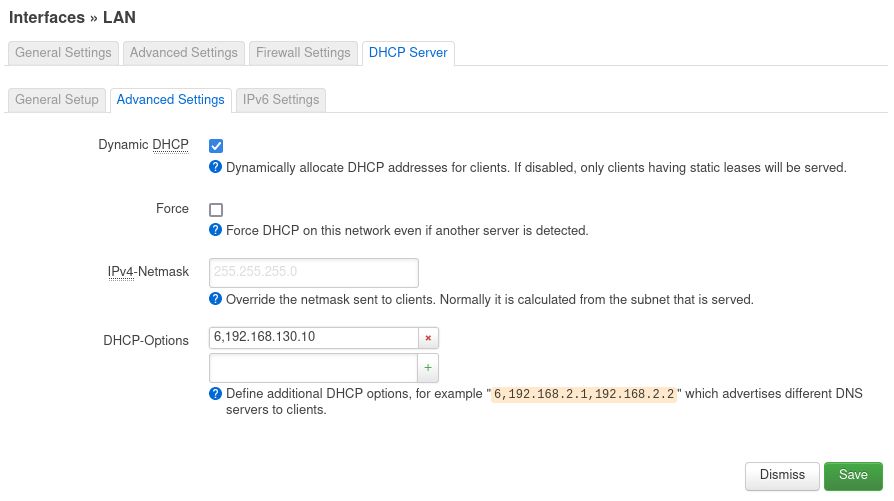
My router runs on OpenWRT. All we need to do here is add a DHCP option so the router tells all clients to use Pi-hole as the DNS server.
Go to Network –> Interfaces. Click “Edit” on the LAN interface. In the “DHCP Server” tab, choose the “Advanced Settings” tab.
Here the screen already tells you how to do it: Add “6,

Rogue devices
Some devices have hardcoded DNS servers, Google devices among them. You can force them to use Pi-hole using the firewall on OpenWRT.
Go to Network –> Firewall and select the “Custom Rules” tab. Add the following rules:
iptables -t nat -A POSTROUTING -j MASQUERADE
iptables -t nat -I PREROUTING -i br-lan -p tcp --dport 53 -j DNAT --to <yourserverip>
iptables -t nat -I PREROUTING -i br-lan -p udp --dport 53 -j DNAT --to <yourserverip>
iptables -t nat -I PREROUTING -i br-lan -p tcp -s <yourserverip> --dport 53 -j ACCEPT
iptables -t nat -I PREROUTING -i br-lan -p udp -s <yourserverip> --dport 53 -j ACCEPT
It will forward traffic destined to outside DNS servers back to your Pi-hole instance.
What about DHCP?
In my setup, DHCP is still managed by OpenWRT. That’s because I have multiple VLANs with different subnets. Pi-hole lacks the functionality to handle them and I like to keep things together.
Pi-hole configuration
A few things still need to be configured on the Pi-hole side.
Log in to Pi-hole (http://
In “Settings” –> “DNS” you need to define the upstream DNS servers. I use the servers given by my ISP. You can use Google’s or OpenDNS’s.
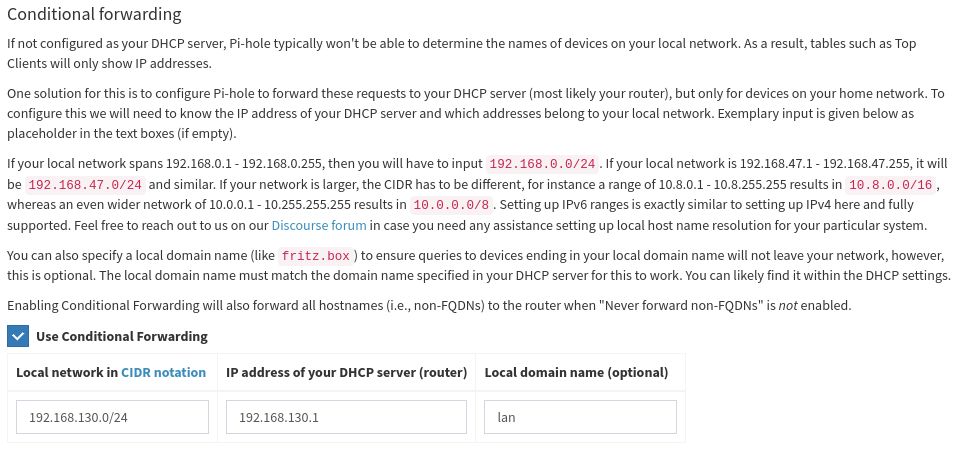
One last thing is “Conditional forwarding”. Since we’re not using Pi-hole as our DHCP server, it doesn’t know about client names, only about IP addresses. This can be tiresome to analyze the traffic as “Wife’s phone” is easier to understand than “192.168.1.125”.

Add your network configuration and the IP address of your DHCP server (which is my router’s).
If you restart your computer and are still able to browse on the Internet, you’re done!


